FAQs
Read through our frequently asked questions below
Vantage has been replaced with the Valkyrie camera range. For more information on Valkyrie go here.
If you need more information about a Vantage camera you own, please visit docs.vicon.com for more information.
The Vero Optical family of cameras combine the benefits of affordable motion capture with the reliability that comes with Vicon’s four decades of experience.
Details on the Vero optical cameras can be found in the page below.

Vero Family
Before you install Nexus 2, note the following limitations on supported systems:
Nexus 2 (Windows 10 configuration fully supported and tested) supports the following reference video options:
For the recommended and latest PC specifications, please refer to https://www.vicon.com/support/faqs/?q=what-are-the-latest-pc-specifications or contact Vicon Support
Nexus 2.13 does not support the use of Basler video cameras. To use Basler video cameras with Nexus, use Nexus 2.12.1 or earlier.
There are a couple reasons as to why cameras will not connect into the software. Below are some items to look at if you are encountering troubles.
1. Is the hardware on and connected to the computer? Make sure the Vicon connectivity device (i.e. POE+, Giganet or Ultranet) is connected to a configured network port. If you have not set up a network port please refer to the FAQ: How do I set up my network card?
2. Is the system in Live Mode? Please go over to the Systems Tab and make sure you are Live. This can be verified at the top of the 3D Perspective; it will either say “Live” or the name of the currently opened trial.
3. Is the Vicon Software being allowed through the Windows Firewall. To check – please see the following FAQ: I just installed the latest version of software but the cameras no longer connect when I run it. What can I do?
4. Do you have Anti-Virus installed? If so, is the active scanning on the Anti-Virus software turned off? The active scanning will disrupt communication between the computer and the cameras.
If the cameras are still not connecting into the software please contact support.
The most up to date Firmware can be found via the Vicon Firmware Update Utility.
The firmware update utility provides a robust guided workflow that allows you to update your camera firmware more reliably.
When the utility is installed and started, allow it through the Windows firewall in order for it to communicate with the cameras and reprogram them.
Note: Starting other Vicon software during the operation of the reprogramming tool may interrupt the updating process.
New updated firmware versions are designed to load onto legacy hardware (i.e. T-Series/Bonita), but do not (unless specially stated) contain any specific updates for these products and are functionally identical to previous legacy firmware builds. The ability to load newer firmware onto legacy hardware is provided for convenience when updating systems containing a supported mix of camera types.
If you own a system comprised of only legacy hardware such as Pre T-Series and Bonita please contact Vicon Support
Mixed Camera Systems:
When running a mixed system please ensure that the Firmware is the same for all cameras.
The Firmware version should correspond to the newest generation of camera in your system.
A mixed or Vantage/Vero camera system needs to be on the latest firmware. For version details, the FAQ: What is the latest version of Firmware?
If your computer is connected to the internet, the Vicon software will do a firmware check. If a firmware update is needed you just need to click on the notification symbol and follow the instructions. Otherwise follow the instructions below.
1. Please download the latest version of the Vicon Firmware Update Utility, extract the files from ViconFirmwareUpdateUtility_x.x.x.xxxxh.zip. Once complete, run the executable inside. This will install the Reprogramming Tool for the appropriate Firmware version on the computer.
2. Once the program has been installed make sure:
3. Double click on the Vicon Firmware Update Utility to start the program. The program will automatically search for all Vicon hardware which can be updated. Click Next when ready.
4. A list of existing Firmware for all devices is now presented. You have the option to reprogram all devices.
This process can be slow. Please do not interrupt the programming process. Once the reprogramming is completed you will be able to go to the next page and close out of the programming tool. If any cameras fail or you have further questions, please contact Vicon Support.
For a pure Legacy system (Pre T-Series and Bonita MX Hardware) Vicon hardware should be on Firmware 502.
1. Download the Firmware and extract the files from the Firmware_502.zip folder. Once extracted place MXFirmware_502.mxe in a location easy to find such as the Desktop or Downloads folder.
2. Make sure all Vicon hardware is turned on. Open the core Vicon Software (Tracker or Nexus).
3. Navigate to the System tab, right click on Local Vicon System and select Reprogram Vicon Firmware. In the new window, all Vicon hardware and current firmware versions is listed.
4. Click Browse and navigate to the saved MXFirmware_502. Once the file has been selected, check which devices need to be reprogrammed and click Reprogram.
The reprogramming process might take some time. Do not interrupt the process. If any cameras fail or if there are further questions, please contact support.
The steps below explains how to update the firmware:
1. Download the “.tgz” file and save it in a known location. As default, when upgrading to a new bundle, CaraLive will open this location: “C:\Users\YOURUSER\AppData\Local\Vicon\CaraLive\Firmware” so preferably, save it in that location.
2. There is no need to decompress the file. CaraLive will run its package contents once it is selected as the new bundle to upload.
3. To install it in the logger, go to the “Actions” option on the logger you want to upgrade and click on it. You will then be presented with three other options. Select “System”.
4. Once in the “System” sub-option, select from the list of available actions the one that reads “Upload New Firmware…”. A pop-up window should appear.
5. As mentioned earlier, CaraLive will open the location where it expects the “.tgz” file to be saved. However, if you have stored the bundle file in a different place, point CaraLive to that folder and select the “.tgz” file.
6. Make sure you have at least 50% of battery before continuing and do not disconnect the power during this process. A warning message will appear, make sure you read it, understand it and then press “Yes” to proceed with the update.
7. CaraLive will show a progress bar and after the process is done, the logger will restart.
8. That’s it! Once the logger is up and running it will have the latest version of CaraBundle.
This procedure is only to upload new bundles. To check and modify already installed ones (because the logger keeps all installed builds unless specifically deleted), the user needs to go to “Actions>System>Manage Firmware…”.
Link aggregation is used to describe various methods for using multiple parallel network connections to increase throughput beyond the limit that one link (one connection) can achieve. Link aggregation is supported in Tracker 1.3+, Nexus 1.8.5+, Blade 2+.
When setting up Link Aggregation ensure that you have the correct Network cards (Intel i340-T4 or the Intel i350-T4 cards) installed on your capture PC. Once you have the correct Network card(s) follow these steps:
1. Make sure your three network ports have fixed IP addresses 192.168.10.1, 192.168.10.2 and 192.168.10.3. A maximum of nine NICs are allowed (192.168.10.1 – 192.168.10.9 inclusive).
2. Connect the 192.168.10.1 and 192.168.10.2 ports to one Giganet/Power over Ethernet switch (POE) and 192.168.10.3 to the other Giganet/POE. You will need an extra cable connecting your Giganets/POEs.
3. Run Tracker/Nexus/Blade, set your workspace to Camera and select all the cameras in the System pane (you will need to expand Vicon Cameras). Please do note that there might be slight differences between the three applications.
4. Turn the Giganet/POE connected to 192.168.10.3 off then select all the cameras that just went red in the System pane.
Select the Destination IP Address drop-down and select 192.168.10.3.
5. Select the remaining (green) cameras then scroll down their Properties, select the Destination IP Address drop-down and select 192.168.10.2.
6. Turn the Giganet/POE connected to 192.168.10.3 back on. Select all the cameras in the System pane.
Save your System configuration.
You can remotely trigger the Vicon MX T-Series system to capture data, based on the input signals an MX Giganet receives from a supported third-party device connected to the Remote Start or Stop sockets.
You must create your own cable to plug into the Remote Start or Stop sockets in the rear of an MX Giganet, using RCA plugs.
More details on how to configure a remote trigger can be found in Chapter 15 of T-Series GoFurther v1.3.pdf.
The analog ADC card is a 64-channel device for generating 16-bit offset binary conversions from analog sources. The input impedance is 1 MΩ. The data sampling frequency is common to all channels; while it is independent of the camera frame rate, it is affected by the camera frame rate specified in Nexus. The maximum rate at which you can sample data via the ADC card is 192,000 samples/second (192 KHz).
No. of Channels |
Max. Capture Frequency (KHz) |
| 1 | 192 |
| 4 | 48 |
| 8 | 24 |
| 16 | 12 |
| 32 | 6 |
| 64 | 3 |
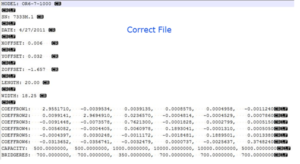
When you add a force plate in Nexus, you are also required to install the Calibration File into the appropriate dialogue box. The Calibration file generally comes with the device from the manufacturer. This can be a .Plt file or an .acl file for AMTI plates.
There may be occasion when the file located does not populate the drop down box on selection within Nexus.
In this instance, you may need to hand edit the file to remove any white space or extra characters, such as Commas and Carriage returns, in order for it to be read by Nexus.
Open the file in a text editor, and remove any white space and/or extra characters not required.

When thinking about latency in Vicon real-time data, it is important to remember that small amounts of latency are introduced at every stage of the pipeline. To most accurately track latency, it is important to be able to measure latency end- to-end over a multi-computer pipeline— starting with the physical motion event, capture and processing by the Vicon system, receipt of the 6-dof sample by a client processor, through the rendering processor pipeline, and finally to the data display.
One of our customers involved in real-time virtual reality came up with a clever set-up to measure latency at every stage of their processing pipeline. This testing method is described in general below.
“We built a custom external timing device to capture the start of a motion event and track the resultant motion sample through the system pipeline. Our latency measurement scheme uses the external timing device together with a manually propelled pendulum to correlate the real and tracked motion. The timing device consists of a 100-ns clock, 6 latched data arrays, and 3 serial ports. The pendulum has an IR emitter on the swing arm and an IR detector on the base. Vicon markers are attached to the swing arm so that its trajectory may be tracked in real time. The clock is started when the swing arm passes over the IR detector. Since this is a known point in space, an identifiable event sample will be generated by the Vicon system. Then any of our software, running on any computer, can send commands via the serial ports to latch the contents of the counter as the sample propagates through the system. This allows us to measure the latencies between different stages of a multi- workstation processing pipeline. A photo-sensor attached to the display screen will automatically set latch 6 when triggered, allowing us to measure the end-to-end latency. The stored timestamps may be read back at any time over any serial port to get a list of latencies.
These tests have been run while tracking different numbers of markers and objects to determine how latency increases with the number of objects tracked. (With the Vicon system, the latency appears to increase in a linear fashion as marker count increases.)”
Cleaning Pearl markers:
Place them in a mild solution of hand soap and water and gently shake them. Then rinse in clean plain water and let them dry.
Do not rub them, as this will reduce their retro-reflectivity by removing glass beads from the surface.
They should be handled with the hands as little as possible to reduce contamination from skin oils.
You should use Strobe mode whenever possible. However, in the following cases, Continuous mode may give better results:
NB: Strobe mode is required for mixed systems that include T-160 cameras.
If you are able to, re-calibrate your cameras before continuing data collection. If you are unable to calibrate until after data collection is completed, note the trial where the calibration needs updating.
1. After data collection, re-calibrate your system
2. Open the trial which needs an updated calibration (XCP)
3. Either:
a. Go to File > Import XCP
b. Within the Pipelines Tools pane, expand File Import and add Import XCP to your pipeline
4. Both options require you to navigate to the desired calibration file. The Latest Calibration file (XCP) is located here: C:\ProgramData\Vicon\Calibrations
5. Use the Import XCP file loading option or pipeline operation for each trial which needs an updated XCP file.
Tip: The Import XCP pipeline operation can be used in batch processing mode to update multiple trials efficiently.
While each camera warms up to meet the ambient temperature of its surroundings, its internal components inevitably change dimension. However, when the components reach operating temperature, their dimensions remain stable. Vicon measures the effects of warm-up and ambient temperature changes on all of its cameras.
For optimal accuracy, we recommend letting the cameras warm-up for at least 30 minutes before calibrating. For capture volumes with lower ambient temperatures, the camera warm-up time could be as high as 90 minutes. Please contact Vicon Support should have you have any further questions.
Important : Vicon Motion Systems Limited provides these specifications for guidance only and reserves the right to make changes to them without notice.
Before purchasing your own PC, please contact Vicon.
FLIR cameras
Important : These PC specifications are subject to continual updates. For the latest information, please contact Vicon Support.
Supported operating systems:
Supported operating systems:
For larger Shōgun systems, we recommend using an Advanced PC.
Supported operating systems:
Suitable for use with Theia3D
Supported operating systems:
Vicon does not supply this machine: the following information is provided as a guide, to enable you to buy a reliable, basic system that is capable of running
Supported operating systems:
Before purchasing your own PC, please contact Vicon.
Vicon is a registered trademark of Oxford Metrics plc.
The Bluetooth word mark is a registered trademark owned by Bluetooth SIG, Inc. and any use of such mark by Vicon is under license.
Intel is a trademark of Intel Corporation or its subsidiaries.
NVIDIA is a trademark and/or registered trademark of NVIDIA Corporation in the U.S. and/or other countries.
Blackfly is a registered trademark of Teledyne FLIR LLC.
Other trade names are those of their respective owners.